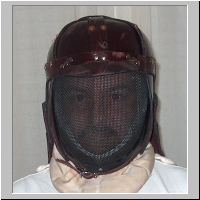
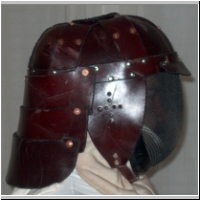
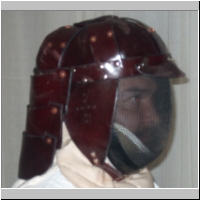
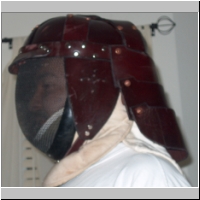
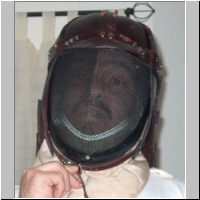
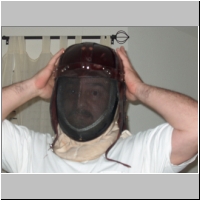
Leather Rapier Helm for Cut & Thrust
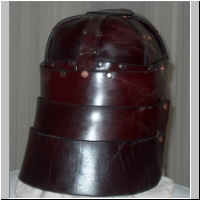
Back Of the Head Protection
Why?
I needed "back of the head" protection for Cut & Thrust and time/money weren't working out for a metal fencing helm. I had seen Baron Kendal's "Leather Rapier Helm" on the net a few times over the years and decided that with the addition of hardening the leather that it would meet the need excellently. Of course this idea was not harmed by the fact that I had a couple of shoulders of leather in the closet and rivets & buckles in assorted sizes left over from various other projects.
Step 1:
Step 2:
Print the pattern pieces on light cardstock & cut out, try to piece together using the minimum of directions that come with the plans. Realize that the pieces are not to the scale marked, reprint using a different image program and measure before cutting out. Realize that the plans do NOT include the hatband piece of leather necessary to connect all of the other pieces. Cut out a 1&3/8" strip for use as a hatband. Size hatband on worn fencing mask & add about 1/2".
At this point I did some analysis, did some things in one way, and should have done some things another. What follows is a combination of both. Here is what I recommend. First, make the various strap pieces 1.5". Second, Don't actually trace or cut the top strap pieces, just use a strap cutter and cut some strips of 1.5" that will be cut to size & shape during use. Also the "Cap Top" pattern segments? They need to have approximately 1/2" added on all three sides.
Step 3:
Make a last/form. I did this after measuring my mask to find the front-to-back length and side-to-side width at the greatest points (absent the rubber seal around the face of the mask) and also measuring the length of the straight sides of the mask and their relative positions to the front and back, draw the straight lines and reference lengths on paper/cardstock then eyeball the curves and fill them in (or try tracing your mask).
Put the headband paper on your mask where you expect to wear it. Temporarily tape it in place and lay your mask on a piece of paper/cardstock with the bottom of the headband flush with the long edge and trace the curve with a pencil. You should now have patterns for your last in couple of dimensions. This is the minimum, you can do more if you feel like.
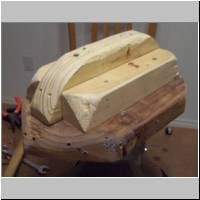
At this point, I took a scrap chunk of 2x8 I had and cut out a shape using the first pattern. I then put a piece of 2x4 on top of that on edge and traced the second pattern against that vertically. I screwed these two pieces together with some deck screws and realized that this was not going to be enough. I added a piece of 2x2 on either side of the 2x4 to give greater internal structure (I knew I was going to be hammering nails into it later). I then took some chisels and a hand sander with the coarsest sandpaper I had and shaped the front and back into an eyeball facsimile of the complex curves of my fencing mask. The last step was to fill and and round out and shape the rest using firmly compressed newspaper and duct tape. You can do something similar or use wood and paper mach�. Whatever method you use, you need to have a last that wet leather can be securely shaped on and nailed to, then baked at 175-180.
Step 4:
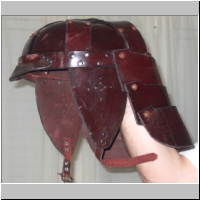
Mark your last. Take a 1.5" strip (Your top center piece) and lay it from nose point to the very back of the mask and mark/trace both sides. Measure and mark along the line to find the center and mark it. Measure around the bottom edge from front center to back center, divide into three parts and mark two equidistant points around the edge on both sides. Lay that 1.5" strip from one of your side marks to the center mark and mark/trace both sides. Repeat for the other three marks. Your last should now be divided into six roughly equal parts divided by 1.5" separators. If you feel like, mark the hatband around the bottom of the last as well.
At this point you may play with your Cap Top Segment patterns and position them to cover the entirety of the form that is NOT in the separator strips, while also ENSURING that they overlap with the separator straps enough for rivets to go through what will be the strap covered portion. You may cut away any extra from your patterns at this point, or plan on doing that to the leather pieces when you fasten them on later. If you modify any pattern pieces, be sure and LABEL their position.
Step 5:
Trace all of your pieces on your leather and cut them out. If you have access to a band saw, it makes this particular job a breeze ;} Again, for the strap pieces make 1.5" straps, one piece that is a couple of inches long than necessary for the top piece, the same for the hatband, one or more pieces that can be cut to length for the four other top strap pieces. I recommend smoothing and/or beveling the edges of your pieces at this time. My leather was already dyed so, I took a wide-tipped black sharpy at colored the edges as well. Oh, and I didn't bother doing anything to the edges of the Cap Top pieces as all of those edges will be hidden.
Step 6:
Decide whether to soak your pieces in rabbit glue & water, Titebond III and water, or just water. I would recommend rabbit glue & water on a low warming plate overnight OR 1 part Titebond III to 10 parts water overnight.
(I used
these directions as my starting point for this.) A large disposable foil roasting pan works wonderfully for soaking all of your pieces in.
Step 7:
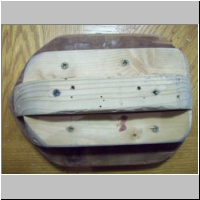
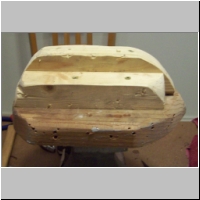
Take out one Cap Top piece and wipe off the excess glue (Do this for each other piece as you go along). Shape it to one of the front positions on the form. Trim any bits that extend over more than half of the marked separator bands and would interfere with the next Cap Top piece. Lay the long top strip over it and nail through both pieces where you think you will probably put rivets. Do the same with another Cap Top piece on the other front section. Take your Hat Band piece and find the center. Place this at the front intersection of all of the other pieces and put a nail through it in each side of the top strip, being sure to go through all three pieces of leather on each side.
Shape the next Cap Top piece along one side (trimming both it and the preceding piece as necessary). Place, shape and cut to fit a piece of strap along the marked band, nailing through both pieces of leather. Shape & pull the Hat Band along that side, nailing it in place where you plan to put rivets, until you have one nail in the new strap. Repeat these steps on the other side. Continue until you have all the cap pieces and straps in place, placing nails where necessary and keeping everything as taut as possible. Now add the Top Center Circle piece (You may have to remove some nails, and add new ones to do this). Now add the brim/eyepiece.
Step 8:
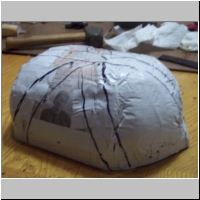
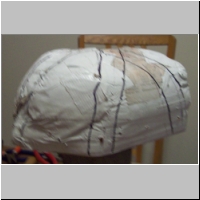
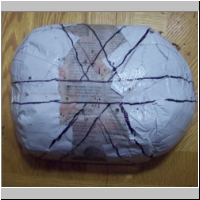
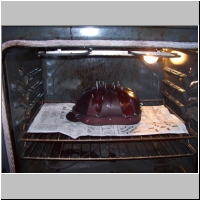
Place your last on a sheet of newspaper in your oven and bake at 175-180 F. until the leather is very, very close to completely dry ... but not quite. This will take a long time, don't forget to check it every 10-15 minutes.
Step 9:
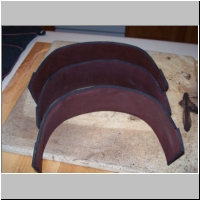
Make a form for your lames. I used a large rolled up towel wrapped in newspaper and somewhat shaped with duct tape.
Repeat step 8 with your lames.
Step 10:
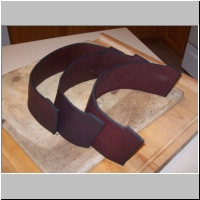
Repeat with your cheek pieces, they only need a gentle curve on the last 2-3 inches
Step 11:
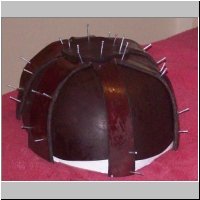
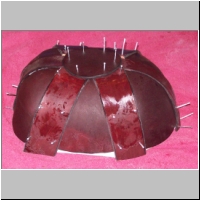
By now your cap last & pieces should be cool. Find a drill bit the same size as your rivets. Now remove the nails holding your leather pieces to the last. If they are in a position you intend a rivet to go, drill a hole through all of the leather layers as you remove each nail. Your pieces should remain in place during this process as they should be hardened by this point.
Step 12:
Seperate the cap pieces, marking position & orientation on the back of each as your remove it.
Step 13:
Rivet the pieces together, in roughly the same order as you put them on the last originally.
Step 14:
Put the cap assembly on your fencing mask and position and mark the posotions for the cheek pieces. Drill three holes for each cheek piece and attach to the inside of the hat band.
Step 15:
Add a buckle and strap to the ends of the cheek pieces. Test fit under the chin of the fencing mask.
Step 16:
Drill a hole in the center of both tabs on each lame. Now, remembering that the topmost lame will be the innermost lame, use the holes in the tabs to mark holes in the bottom of the top and middle lames. Make sure the lames are touching across the curves and have at least a 1/2" overlap.
Step 17:
Position and mark the holes for the lame assembly on the cap assembly. Drill holes & rivet. You're done *grin*
Leather Rapier Helm Pictures